Pumpkin Carving 101
By Serena Bailey
We’re a week out from Halloween, which means it’s almost time for pumpkin carving. My mom is the master of all things holidays as far as I’m concerned and has carved at least one pumpkin every year for as long as I can remember. So this year when I set out to carve one all on my own, I called her and got the rundown of how to carve the perfect pumpkin.
Allow me to pass on my mother’s wisdom to you combined with my own experience.
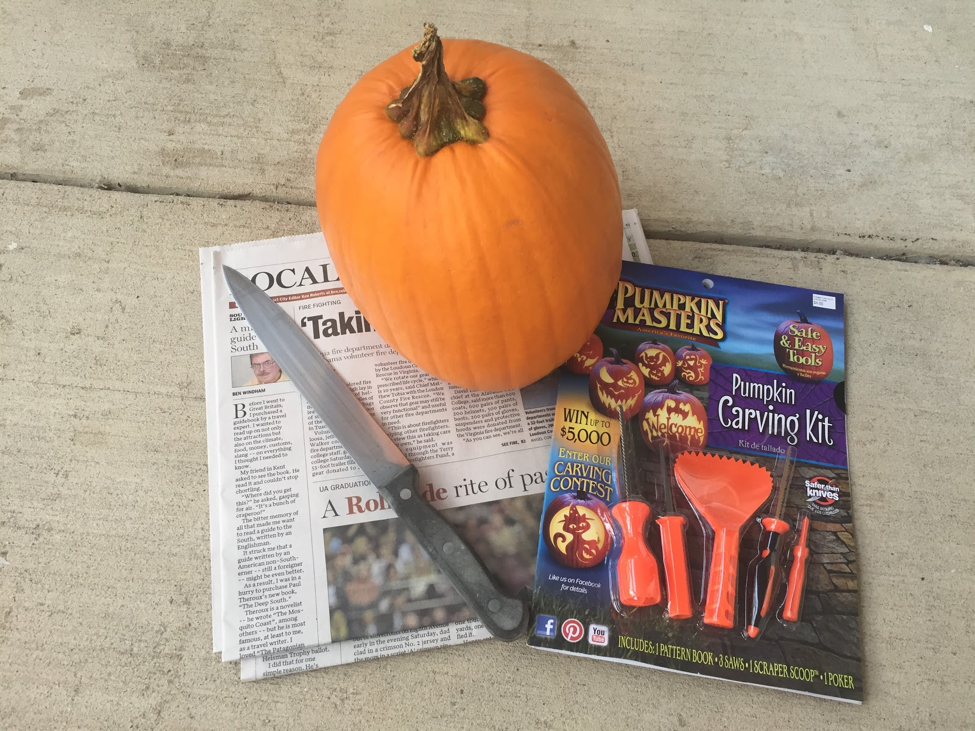
Step 1: Get a pumpkin (obviously) and a carving kit
Whether you get it from a patch or from a supermarket, make sure you pick a decent-sized one. You don’t want one that’s too small because then you won’t have enough room to carve, but you don’t want one that’s too big either or it’ll take forever to clean out. A good size is about 10 – 13 inches. Basically if you can’t pick it up or carry it on your own, maybe try for a smaller one.
Make sure it’s good quality, too. A good pumpkin should be nice and firm. If it seems squishy or soft in some places, put it back.
Once you’ve found your perfect pumpkin, my mom and I recommend picking up a carving kit. The basic ones cost about $4, come with everything you need, and are far safer than using kitchen knives. Pumpkin Masters is the most prominent brand and their kits also come with a book of patterns for you to carve.
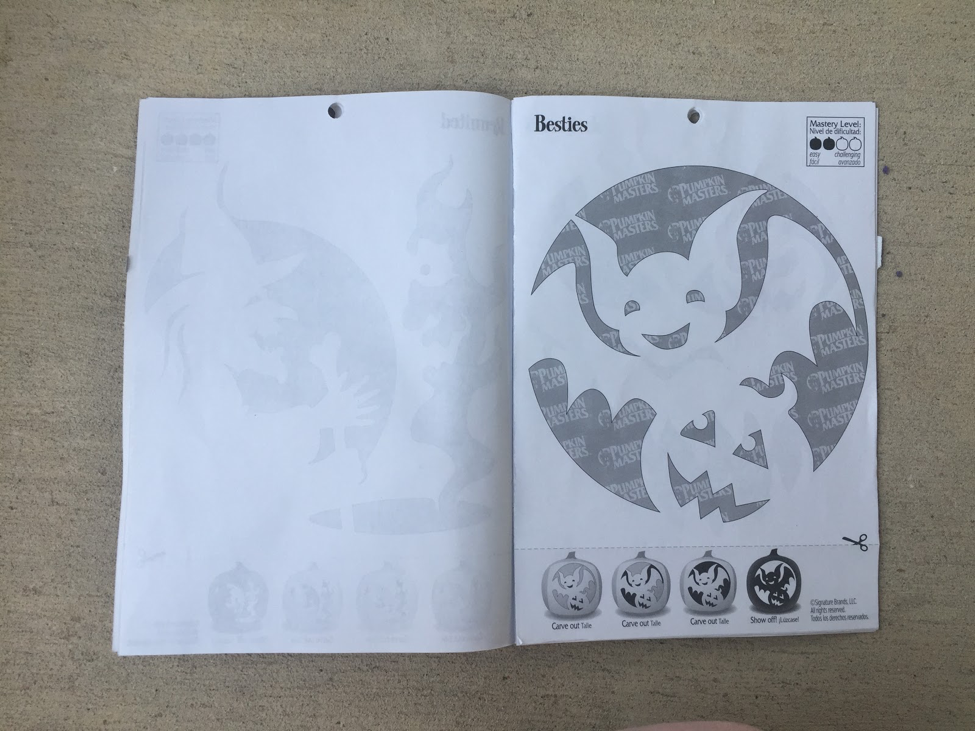
Step 2: Pick a pattern
If you flip through a Pumpkin Masters pattern book, you’ll find a variety of patterns from cute and simple to more spooky and complex. Luckily Pumpkin Masters has a ranking system on their patterns to help you out. Each pattern is rated on a scale of one to four pumpkins, one being the least complex and four being the most.
This was my first pumpkin carving, but I’ve been watching my mom do it for as long as I can remember so I picked a level two pattern. (Okay, I also picked it because it was really cute.)
You can also just draw on the pumpkin and carve out your own pattern, but I’m nowhere near that creative or artistic.
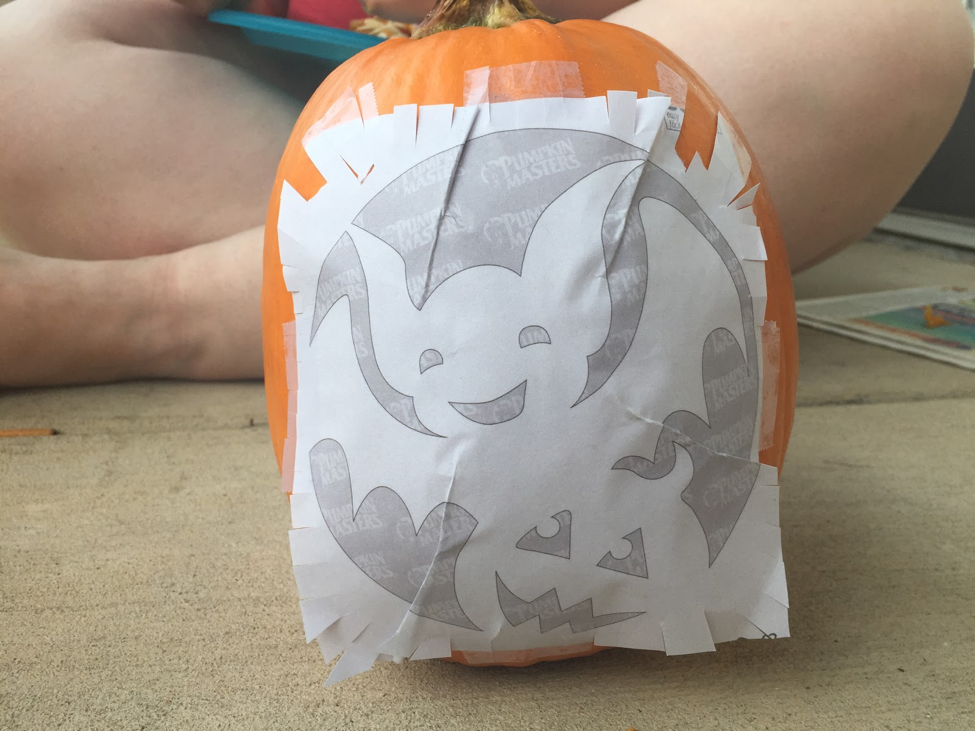
Step 3: Prepare your pattern
Once you’ve picked out a pattern, you’ve got a couple options for the next step. The instructions in the carving book say to remove the pattern from the book, wet it, mold it to the pumpkin, cover it in plastic wrap and begin carving.
Except, if you take that route, you can never use that pattern again. You’ve ruined the paper and cut it up; if you really like that pattern, you’ll have to buy a new book next year. My mom has used the same pattern book for years, marking what years she’s used specific patterns so that she doesn’t use the same ones too frequently.
Instead of ruining a good pattern, my mom recommends making a copy of the pattern, resizing it to fit your pumpkin if necessary, and cutting that one out.
Make sure the pattern fits by laying it over the pumpkin. You will have to fold the paper in some places to ensure that it fits the shape. I also cut the sides of the paper, which makes it a little easier. Just be careful not to distort the image you’re trying to carve by keeping all your folding in the grey areas of the pattern if possible.
Once you’ve prepped your pattern, put it aside. Now the real fun begins.
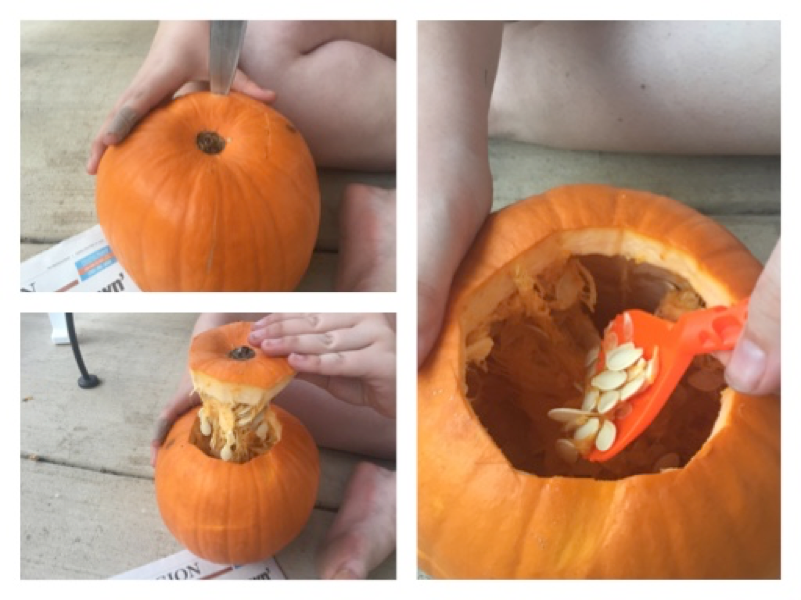
Step 4: Prepare you pumpkin
For the beginning of this step, you will need a sharp kitchen knife. My mother recommended a butcher’s knife, but since my pumpkin was smaller than what she usually gets, I chose a slightly smaller one. It’s still a pretty big knife though.
Cut a hole in the bottom of your pumpkin by gently inserting the knife straight in and carefully cutting out a somewhat circular shape. Don’t push the knife in too hard or you might poke through the top of the pumpkin. Also, take your time cutting out the bottom; you don’t want to hurt yourself.
Once you’ve cut the pumpkin open, pick up that shovel that came with the pumpkin carving kit and scrape out all the seeds and other stuff inside. If you want, you can set the seed aside so they can be roasted later. Make sure you scrape as much of what’s inside the pumpkin as possible. You don’t want to weaken the walls of the pumpkin, but you also don’t want excess goop making it harder to carve.
Step 5: Transfer the pattern
This step requires a bit of patience. It’s an extra step but it makes the carving process much easier.
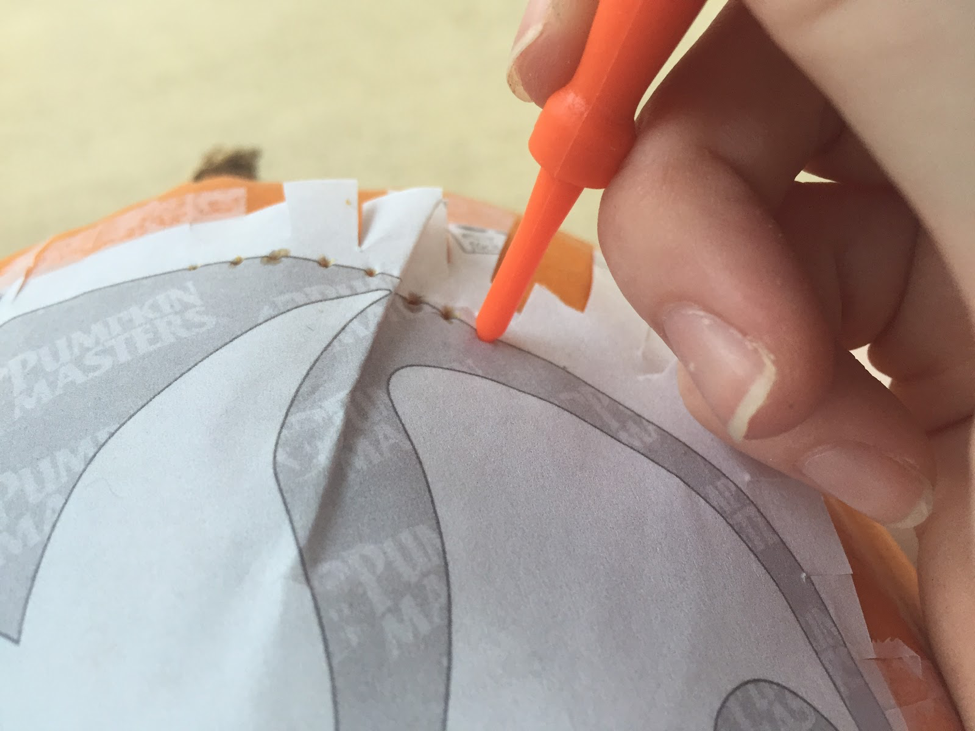
That pattern you prepared in step 3, attach it back to the pumpkin. I used to tape to make mine stay on. Then take the little, blunt tool that came with your pumpkin carving and make a series of dots along the outside. Trace the whole pattern and take special care to poke dots at all the sharp points where lines meet on the pattern.
As my mother said when I called and asked for pumpkin carving advice, “Take your time. Don’t try to rush this.” This will be the line you follow to cut into your pumpkin, so you want to make sure they’re right and that you have enough of a pattern to follow.
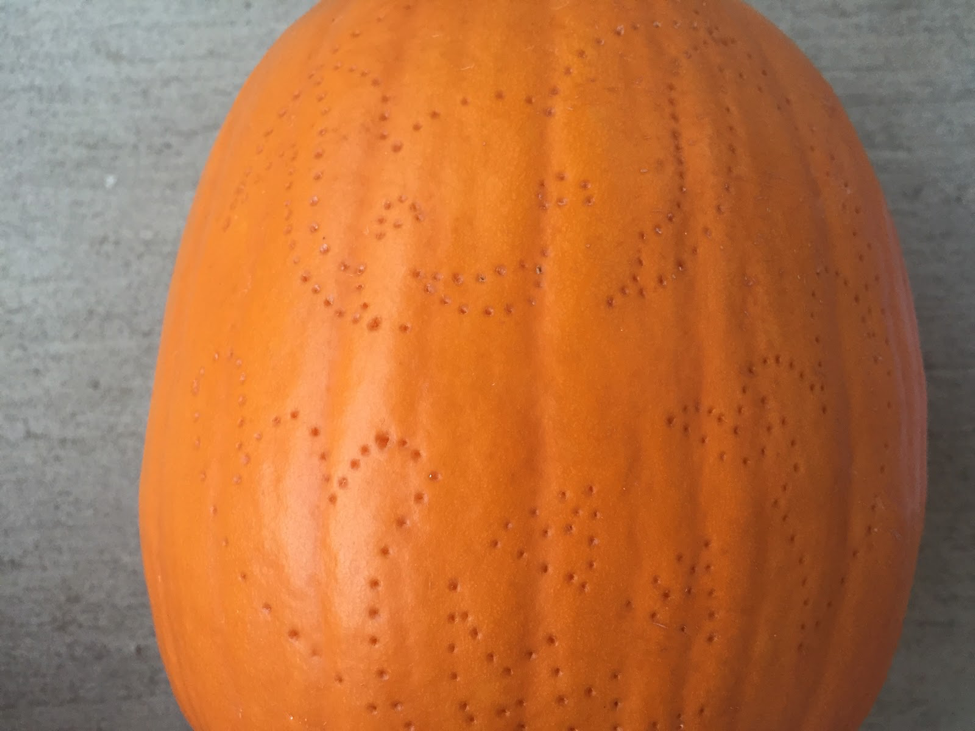
When you’re done, remove the pattern from the pumpkin. Your pumpkin should now look like an unstarted connect the dots activity page. Take a glance to make sure your dot pattern looks like the line pattern and then breathe a sigh of relief because we finally got to the part you’ve been waiting for.
Step 6: Carve the pumpkin
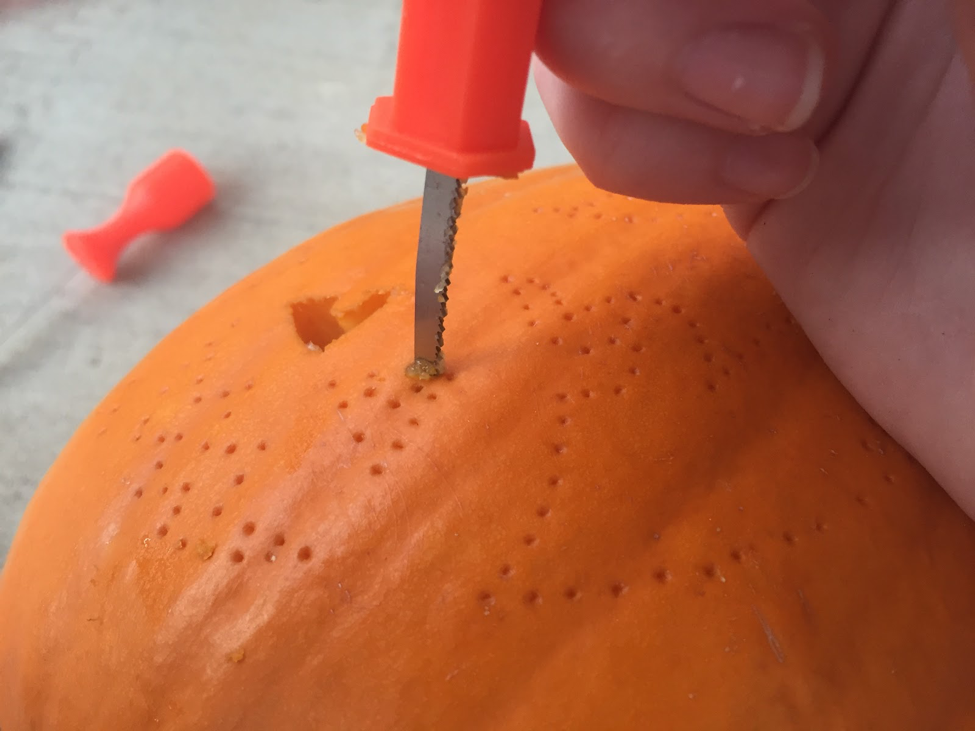
Using the carving knives in the kit, carefully and slowly cut into the pumpkin following the pattern you’ve dotted on. I recommend starting with the smallest chunks, eyes and mouths, because they will require the most care to ensure accuracy. For those you’ll want to use the small knife in the kit.
After you’ve cut something, tap it so it falls into the pumpkin and out of the way. Take your time, go slow and follow the dots. The pumpkin is easier to cut into than you think, which means it’s very easy to accidentally get off pattern if you rush.
Sometimes you may have to go back over lines to make sure you’ve cut all the way through. If there is still some stringiness left inside the pumpkin, the chunks you’ve cut may not want to disconnect. If that happens, take one of the carving knifes or your scraper tool to disconnect the cutting from the pumpkin.
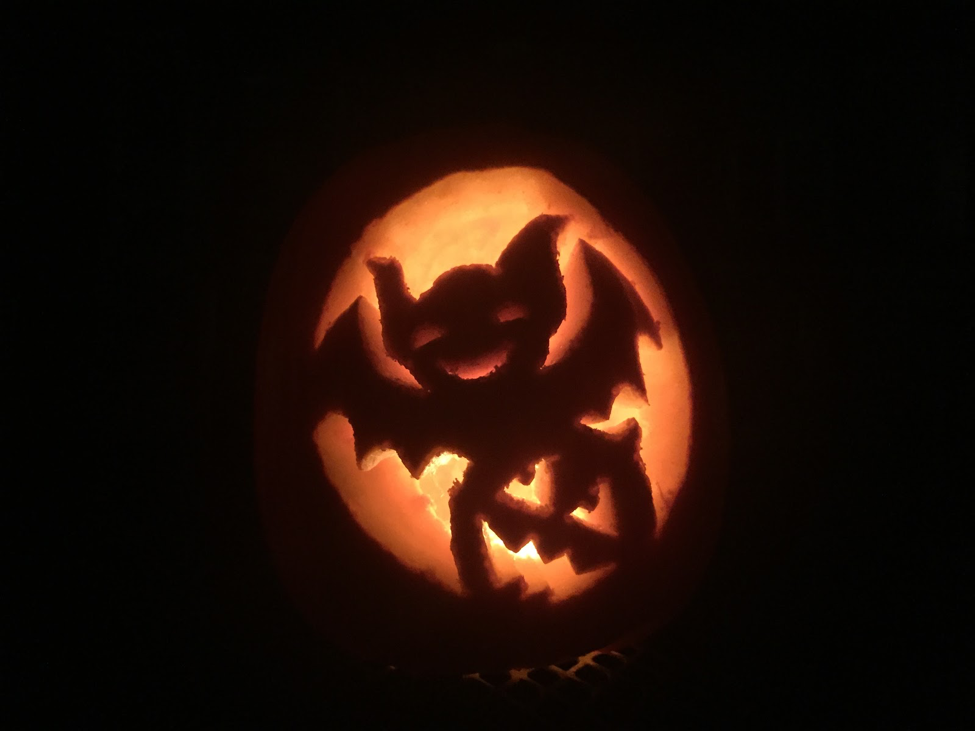
Step 7: Preserve and display your pumpkin
Once you’ve carved the image into your pumpkin, wipe off all the excess shavings and throw the chunks you cut out away. Then, rub petroleum jelly on the cut parts of the pumpkin and allow it to dry. This keeps the air out and allows your pumpkin to withstand the elements a little longer.
To display your pumpkin, there’s a couple different options. You can use the traditional candle method and place a tea light under you candle at night. Tea lights will burn themselves out after a few hours so you don’t have to worry about forgetting to leave the candle lit all night.
Even so, tea lights are still a real flame so they still pose a fire risk. If you don’t trust yourself of your neighbors to not knock your pumpkin over, you can get a battery operated light. Target sells lights made by Pumpkin Masters with three different light settings for $5, or you can buy a two-pack of battery operated tea lights for $4 at Target or $1 at Dollar Tree.
Since you’ve cut out the bottom of your pumpkin, all you have to do once you get your light source is place the pumpkin over it and let the carving shine.
Now, put that beautifully carved pumpkin out on your porch and make all your neighbors jealous of your Halloween skills.
Photos by Serena Bailey.


